Table of contents
References:
-
NeRF源码解读-dezeming | dezeming.top
- Searched by
杀生丸学aiin DDG(250410)
- Searched by
(2022-07-20)
Hyperparameters
-
N_rand或batch_rays是一个 epoch/iteration 要训练的光线,no_batching是每 epoch 只从一张图中选像素训练,若为 False 则打乱所有训练图像的像素(都与test阶段渲染全图无关)。llff 使用了batching,每一个 epoch 使用的(4096)光线来自所有训练图像; 而 blender 不做 batching,每 epoch 只从一张图中取光线,所以
N_rand也较小(1024), 有人说是因为 blender 包含 360 度的图片,可能会采到完全对立的两条光线(一个从正面看,一个从反面看),可能影响训练(影响density分布?)。 NeRF源码解析-什度学习 -
N_samples决定每条光线上的采样点数量和NeRF的渲染质量; -
chunk是 model 一次计算的 rays,netchunk是实际每次输入 model 的 3D points 量(模型的 train 和 test 都与它们有关)。 chunk 和 netchunk 是两层循环。1 2 3 4 5 6 7 8 9 10 11 12 13 14 15 16# Select N_rand rays for training. # Or input all rays in an image (H,W) for rendering def render(rays): for each ray-chunk in rays: ret = render_rays(ray-chunk) def render_rays(): # Sampling 3D points and do PE for each point-netchunk in all points of this ray-chunk: raw.append(model(pts-netchunk)) return tf.concat(raw) # Collect ret for each ray-chunk ret_list.append[ret] # All rays are composed: all_ret = tf.concat(ret_list) # for N_rand or (H,W) rayschunk(光线)和netchunk(点)可依显存大小调整。当N_rand相同,而netchunk不同,曲线几乎重叠(~0.03),只影响训练速度。虽预设
chunk=1024x32,但N_rand (batch_rays)预设只有1024, 所以实际输入 model 的光线是 1024,则输入 coarse model 的数据点有1024x64个(真正的’batch_size’),当通过attention layer时,要创建一个 (65536,128,128) 张量要用1.07G(不,tf 先创建计算图,PE 函数占了8个G,其他的显存应该是返回值(tensor)占的) -
ndc 在
render()中默认为True, 只有当数据集不是 llff 类型,或指定不使用 ndc(--no_ndc)时,参数字典会添加一项ndc=False。 -
lindisp = False 是对深度(世界空间:[near,far] 或者 ndc 空间:[0,1])线性采样; 为
True则对 1/depth 线性采样 -
testskip不影响llff, 也不影响 train 集(逐张训练),跑 val 集和 test 集会跳过图片。 -
factor是 llff 数据集在load_llff_data()时的 shrink 倍数,half_res影响 blender(和deepVoxel)数据集;render_factor是 test 阶段(render_path())的渲染分辨率 -
random_seed在 test 阶段不起作用(perturb=False, raw_noise_std=0)。 在train 时,(use_batching) 会 打乱 所有像素, (no_batching)会 随机 选图片和像素, 在 density 上加随机 noise,在光线采样时加入随机 perturb。 -
perturb和raw_noise_std在 test (--render_only,render_path()) 渲染阶段都是0。
OOM
3 similar variables:
-
N_randis the #rays used for 1 “epoch” to train -
chunkis the #rays to dorender_rays()in aforloop, where points will be sampled to do positional embedding (fine stage has double pts to do PE.),-
The
embedded_fn()in coarse stage takes 2G meomery; Theembedded_dirs()in coarse stage takes 2G; And the fine stage takes another 4G. NeRF model takes 357 MB. -
Dict
all_retcontains all the returend values from model. In the 12th iteration ofrender_rays()after coarse stage, VRAM becomes 10763 MB from 8465 MB and then OOM, where I returned 3 additional tensors:pts,viewdirs,z_vals. So the return value seems to occupy memory as well. -
But if keeping the original settings where fewer tensors are returned, it becomes 10763 MB when finishing the ray-chunk
forloop (32768 ray x 23 chunks) inbatchify_rays(). -
Memory change: 485 MB ⮕ 2277 MB ⮕ 4369 MB ⮕ 8465 MB
-
-
netchunkis the #pts fed into model.
retraw is one of the reasons:
- With setting
--render_onlyand--factor=4, ifretraw=True, OOM occurs at the lineall_ret = {k: tf.concat(all_ret[k], 0) for k in all_ret}inbatchify_ray().This shows that the returned values indeed take some memory.1 2rgb, disp, acc, extras = render( H, W, focal, chunk=chunk, c2w=c2w[:3, :4], retraw=True, **render_kwargs)
(2022-12-26)
Inverse transform sampling
sample_pdf(z_vals_mid, color_weights[...,1:-1],N_importance,) code
-
PDF is the proportion of the color-weight of a point to the sum of all weights on a ray. Each point has a ratio indicating how much of its color contributes to the pixel color. (They exclueded the start and end pts, and may only focus on the distribution of the middle part.)
-
CDF tells how much the color has been rendered up to the current point. The input of CDF is the color-weight of a point, and its output is the cumulative weight from
roto that point. The weights will be accumulated to 1. So coarse net learns the weights CDF roughly. And fine sampling is based on the CDF increment. -
(When testing)
N_importancepointsuare selected evenly from [0,1] and they will fall into buckets spaced apart by CDFs of coarse points. The percentage of the position ofubetween the coarse point below and above it determines the distance marching from its corresponding left-neighbor z_vals_mid. The marching distance of a fine ptszis proportional to the increment of cdf. -
When the CDF rises faster, there are more samples because the steep slope makes many
us fall together.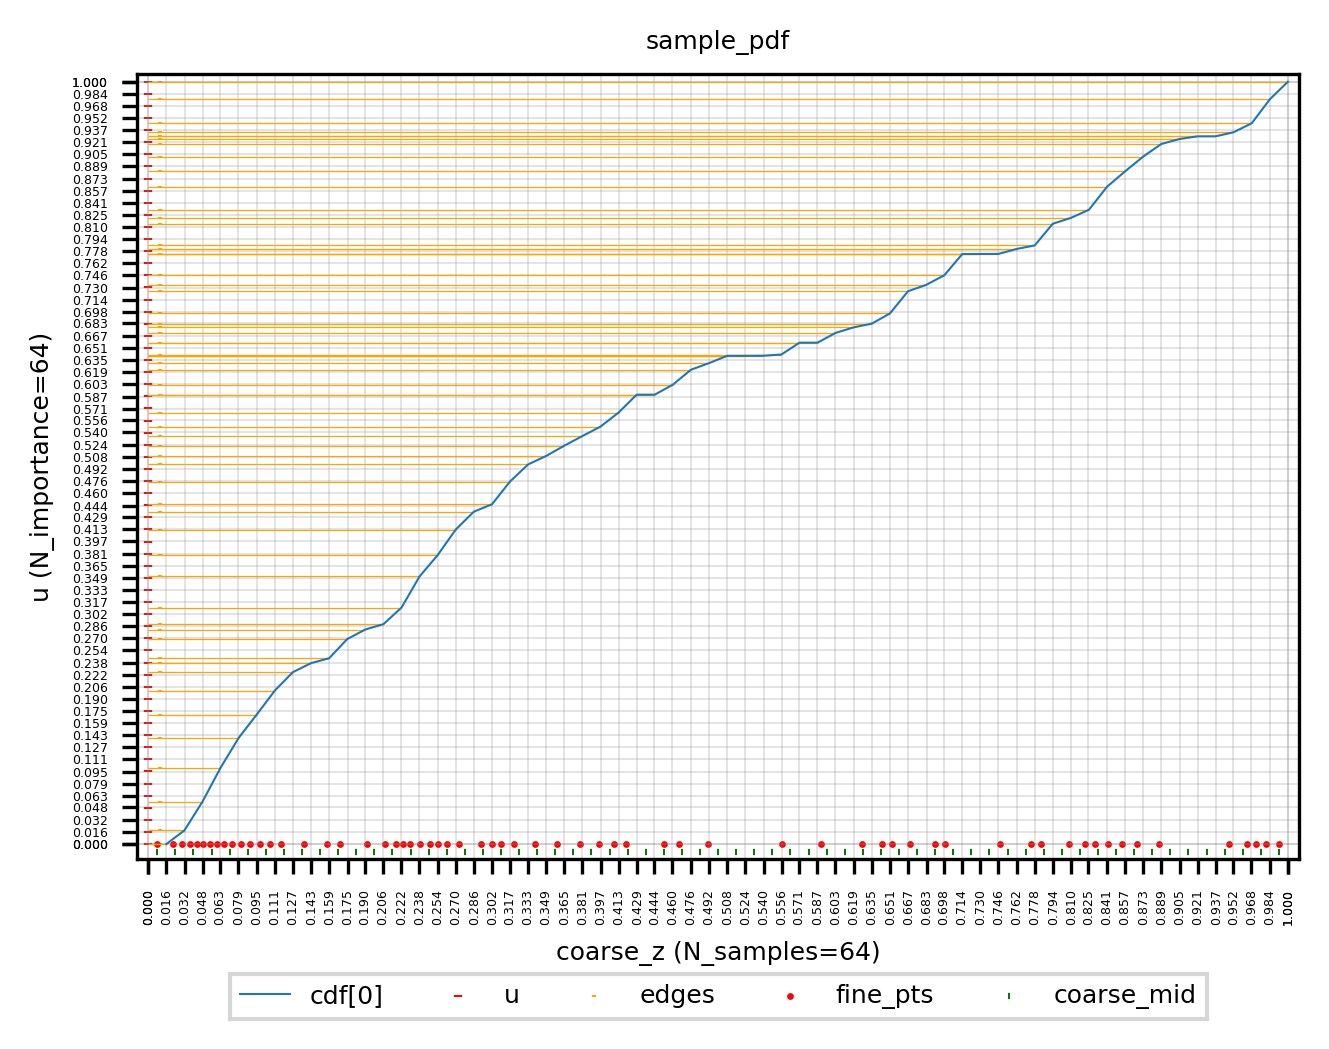
In the above figure, the vertical coordiantes are the uniformly sampled
u. Horizontal x-ticks are coarse samples on a ray. Green markers|are midpoints of coarse samples’ z. Red points are fine samples. Red points are all start from a midpoint and march a distance which is proportional to the cdf increment of its correspondingu. -
tf.searchsorted(seq, values, side)returns the bin-index for each value.seqdefines a series of bins, andvaluesare assigned to bin-indices based on the edges listed in seq.sideindicates whether the index of a bin is marked by its left or right edge. For example: edges = [-1, 3.3, 9.1, 10.0]; values = [0.0, 4.1, 12.0], return array([1,2,4]) more1 2 30 1 2 3 4 ————|———●—————|————●———————————|————|————●———— -1 0 3.3 4.1 9.1 10 12
(2022-06-15)
PE has no π
(pi in positional embedding? #12)
世界坐标系下的 z(通过 projectmatrix 的第3行)从 (-near,-∞) 的范围缩放到了ndc坐标的[-1,1],x,y并没有参与z的缩放,x,y是依据屏幕大小缩放的,如果 scene 不能被一个屏幕装下(一幅image没有把scene拍全),屏幕外的点的坐标是在[-1,1]范围外的:比如 scene 的范围是[-1.5, 1.5],然后在embed时乘上π,则最低频时的定义域为 [-1.5π, 1.5π],因为周期性,多个x可能对应同一个y,导致重复嵌入,所以再缩放一个π,定义域变为[-1.5,1.5],在这段区间上是单调的,不同的x被编码后的值是不同的。 nerf代码分享-爱睡觉的人人-bili

(2022-06-15)
Use t to sample points
使用中间量 t 是为了统一 LLFF 场景和 blender 场景对光线采样的代码(llff 的光线长度z∈[0,1],blender的光线长度z∈[near,far])。
blender场景边界有限可以直接对光线长度采样,但是 llff 场景光线无限长(直接采点效果不好?), 需要先将场景的世界系变换为 NDC 系(只对 llff 场景有效),左乘 projection matrix 使世界系的 z 方向边界坐标 [-near,-far] 变为 [-1,1]。
则世界系中的rays表达式: 𝐫=𝐨+t𝐝 变成了 𝐫=𝐨’+t’𝐝’ (起点𝐨’和方向𝐝’都是near,far的函数); 令𝐨’=𝐨,则(世界)光线长度t∈[0,∞] 变成(NDC)光线长度 t’∈[0,1] 附录公式15。 后面就可以通过对 t’∈[0,1] 采样,来对世界系中的各条光线采样(不是对世界空间的z轴采样,而是在各条光线上采样)。
-
在对世界光线做 NDC 变换前,把各条光线的起点 𝐨 转移到其与近平面 (z_world=-near) 的交点处,这样变换到NDC后,光线长度t’=0 就对应着 -near,只会对各条光线落在z_world∈[-near,-far]的部分采样。在从世界系变到NDC中光线(𝐨’和𝐝’)时,认为near平面在z_world=1处(函数
ndc_rays()的参数), far平面在 z_world=∞ 处 (公式23,24)。 (作者在issue34解释说:) 因为NDC的z轴是按 1/depth 线性变化的,所以世界系-far=∞没关系(变到ndc中就是far=1),只会稍微降低采样效率。 -
确定好ndc光线后,把near,far重新赋值为光线长度的取值范围(llff 的NDC中光线长度的取值范围只能是[0,1],而blender场景的光线长度范围就是世界系的[near,far]),用于在各光线上采样,再根据光线公式𝐨’+z⋅𝐝’得到采样点的3D坐标。(near,far不是depth深度范围,而是射线长度。) nerf code
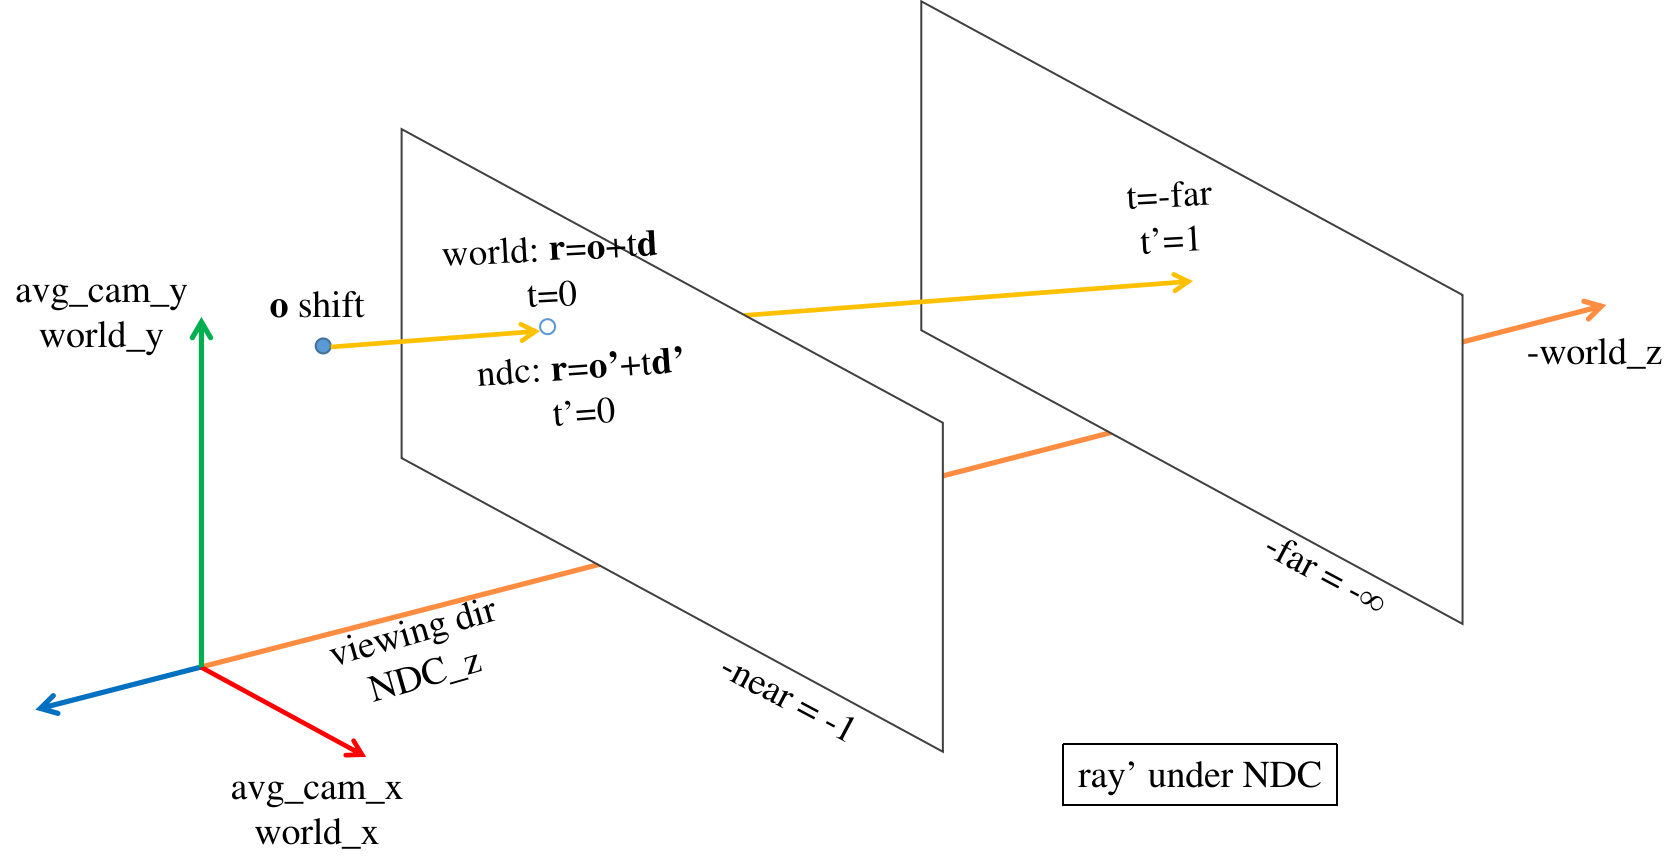
near,far本来只是长度,在nerf中,世界系(avg_camera)与相机系z轴重合,scene落在-z方向,所以近远边界的 世界坐标 为-near,-far,而ndc的z轴方向是相机观测方向,近远平面的ndc坐标=-1,1。
(2024-07-15)
- 我上面说的“世界坐标系”,应该是指那个“平均相机坐标系”,因为 Projection Matrix 是把相机系坐标变换到 clipping space。
(2023-05-25)
t or z sampling
When sampling points:
|
|
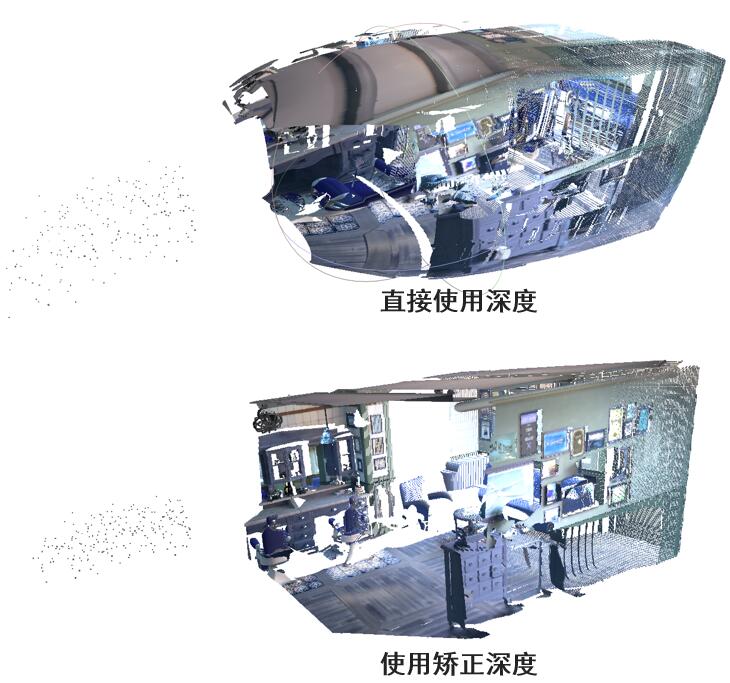
will: 这里rays_d要是没有归一化,直接就是 K逆*(u,v,1),那这里z_vals 就是到成像平面距离;如果归一化了,那就是到光心距离. (QQ chat 2023-05-25T04:09:00)
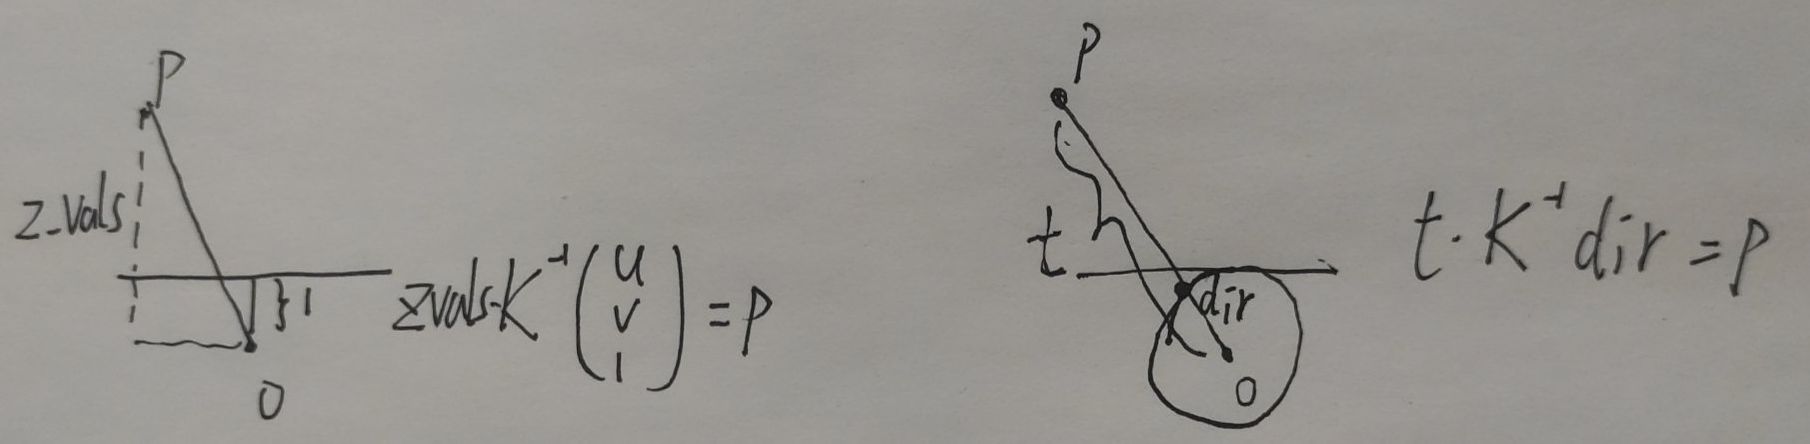
哈哈: 基于数据集给定的深度直接映射三维点,远端会膨胀,投影到z轴上几何就正常了,所以NeRF出来的深度是视点到三维点的距离
(2022-06-15)
Rays in NeRF
对光线的处理:(camera ➔ world (avg camera) ➔ ndc)
-
构造(“世界系"中的)光线:
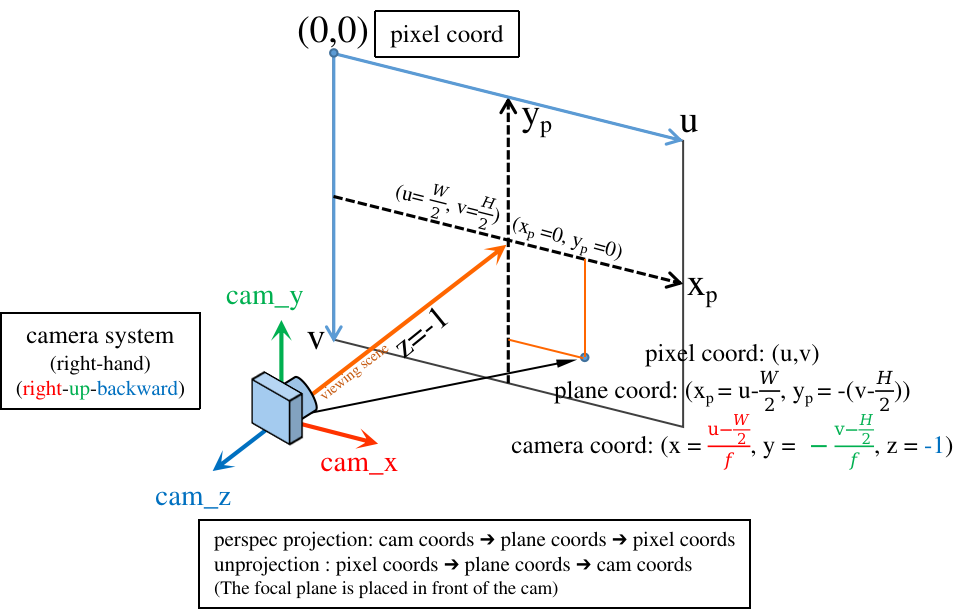
rays=get_rays_np(c2w) -> (ro+rd, 3)- 像素系(u,v) ➔ 成像平面系(u-cx, v-cy) ➔ unproj2相机系(x=u-cx/f, y=-(v-cy)/f, z=-1) ➔ ∗c2w(“世界系”),这里取平均相机系作为“世界系”。只有把光线变换到一个共同的"世界系"下才能用不同视图对同一 3D point 做优化。
- 传入的
c2w=poses[:,:3,:4] 是从load_llff_data()返回,其中函数recenter_poses()/spherify_poses()调整原poses,让它们能够把点变换到"新世界系"下。(NeRF代码中的poses全是c2w变换)avgc_2w=poses_avg(poses),平均相机系➔世界系poses=np.linalg.inv(avgc_2w)@poses,相机系➔世界系➔平均相机系(‘新世界系’)
-
渲染(世界系中的)光线:
rgb=render(batch_rays)- ro, rd = ndc_rays(near, ro, rd),光线的世界坐标变NDC
- all_ret = batchify_rays(rays,chunk);在
render_rays()中,从NDC的 [near,far] 采样z
-
不直接使用 colmap 生成的c2w,因为 colmap (sfm) 中的世界系是由输入序列的第一帧确定的,但第一帧的方向是随机的,不一定正对scene,场景就重建不全,后面帧的 poses (列向量)都是相机在世界系中的表示 爱睡觉人人16:00。
-
从像素平面构建出的 rays 是沿着相机系的-z轴的(观测方向,即景物在相机z轴的背面),也就是NDC的Z轴方向(ndc假设);把光线变到平均相机系(世界系)下后,再变换到NDC,则scene就落在NDC的正半z轴上(之后都使用ndc坐标)。
因为 NDC 假设相机是沿 -z 方向观察,所以取各相机z轴反方向的平均,作为NDC的z轴方向。 因为光线先被变换到世界系下,再把世界系变为NDC(而OpenGL是把相机系变换到ndc),所以世界系的z轴与NDC的z轴一样看向scene。nerf-issue#34 LLFF data preprocessing -
求平均相机系(在世界系下的表示)
recenter_poses: 相机光心的坐标直接对第4列取平均得到;旋转矩阵R分为3个列向量:各相机z轴取平均,再使用右手定则确定x,y。 把4个列向量x,y,z轴和光心 concat 起来就是平均相机系在世界系中的表示,就是c2w。c2w 求逆得 w2c。 原poses 把相机系中点变换到世界系下,再由w2c变换到平均相机系(‘新世界系’)下。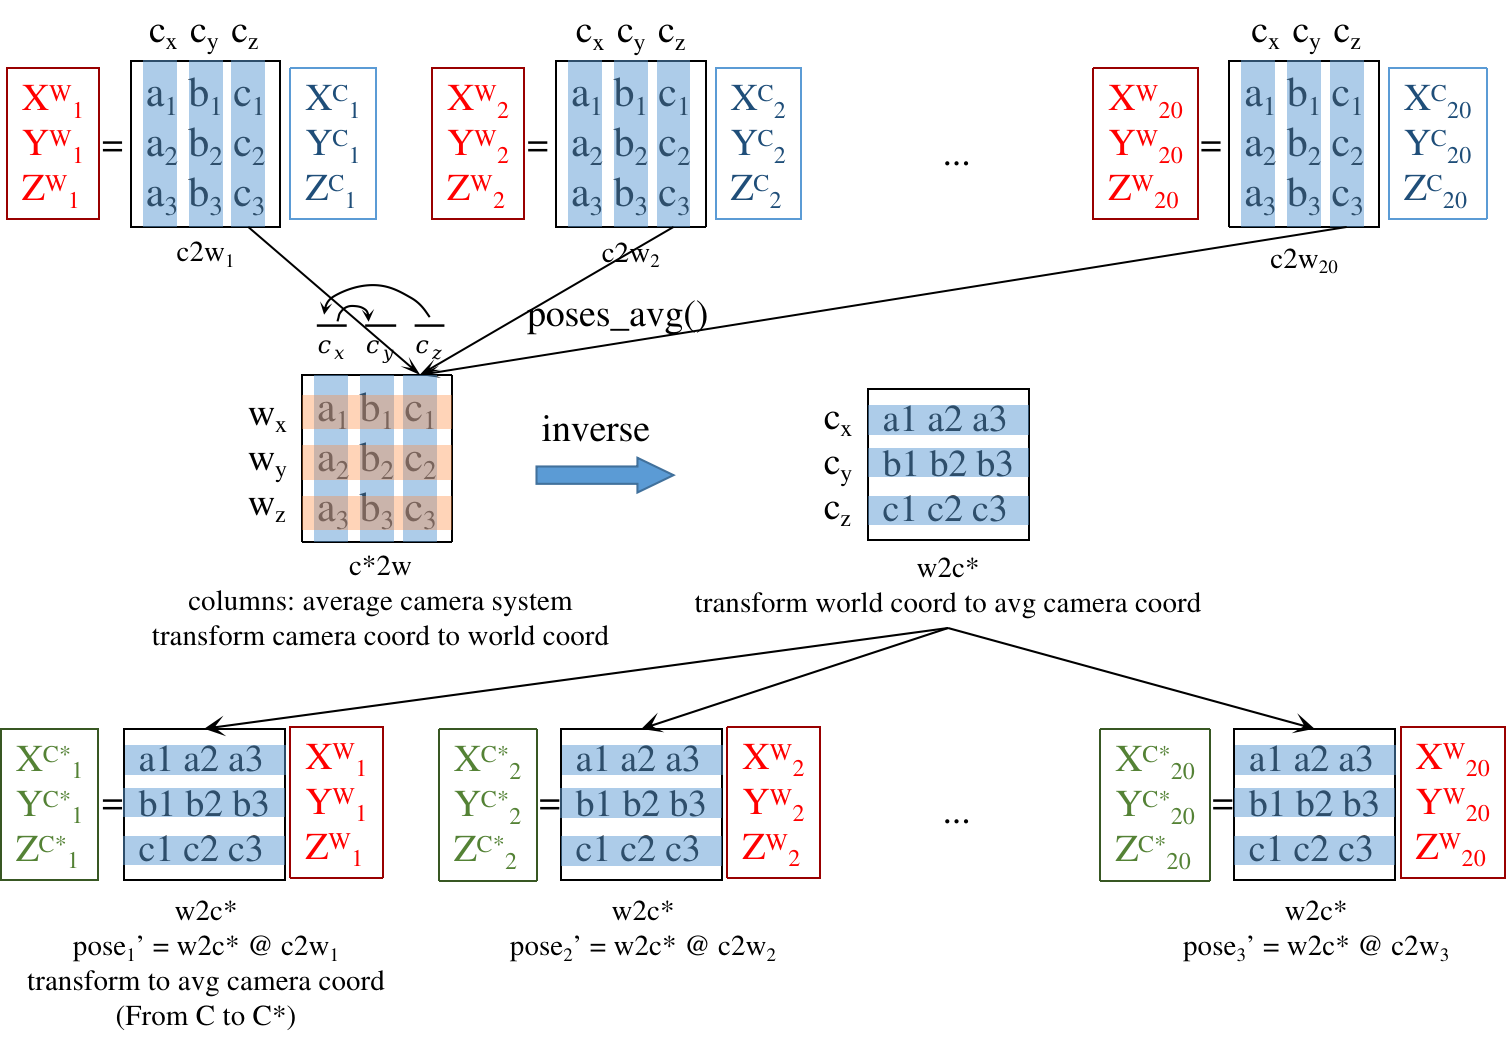 (矩阵的列名是源系, 行名是目标系, 变换顺序为从’列’到’行’, 每列的意义是’源’ seen from ‘目标系’)
 -
对poses $\begin{bmatrix} R & t \\\ 0 & 1 \end{bmatrix}$ 求逆时,R转置,t 会有一点变化,最后一行还是0001。
(2024-03-29)
-
对 c2w 求逆后,w2c 中的 t 等于 $-R_{c2w}^T t_{c2w}$. For example, given a 3D point p, suppose its world-space coordinates is P. And its camera-space coordinates is X. So, there is:
$$ \begin{bmatrix} R_{c2w} & t_{c2w} \\\ 0 & 1 \end{bmatrix} \begin{bmatrix} X \\\ 1 \end{bmatrix} = \begin{bmatrix} P \\\ 1 \end{bmatrix} \\\ R_{c2w} X + t_{c2w} = P \\\ X = R_{c2w}^{-1} (P - t_{c2w}) \\\ X = \underbrace{R_{c2w}^T}\_{R_{w2c}} P \underbrace{- R_{c2w}^T t_{c2w}}\_{t_{w2c}} $$
-
-
doubt: rays_d = dir@c2w.T 是怎么推导的? (c2w ∗ dir)ᵀ = dirᵀ ∗ c2wᵀ nerf-pl
(2022-05-22)
-
doubt: C2W 是 K[R|T] 的逆,colmap直接求出了?对
c2w 中的 [R|T] 为:
$$ \begin{array}{ccc} \qquad \rm Xcam \quad\quad Ycam \quad\quad Zcam \quad cam\ center\\\ \begin{bmatrix} 0.989 & -0.0224 & -0.142 & -3.67 \\\ -0.0272 & -0.999 & -0.0318 & -1.603 \\\ -0.141 & -0.0354 & -0.989 & -0.276 \end{bmatrix} \end{array} $$- 构造 world 系中的光线即确定 ro 和 rd:ro就是 cam center 在world中的坐标,就等于c2w第4列
ro=c2w[:3,-1],rd 是用像素(u,v)对应的相机系坐标(u,v,1)变换到world系下的坐标(xw,yw,zw)表示rd=c2w[:3,:3]@pixels_cam_coord
- 构造 world 系中的光线即确定 ro 和 rd:ro就是 cam center 在world中的坐标,就等于c2w第4列
bds.min
- 在load数据时,缩放场景下界
bds.min()和平移变量T(至1./bd_factor,R不需缩放)是为了以防场景太大,变换到 NDC 时超出 near 平面;虽然这里缩放后的边界不等于 near,但之后在ndc_rays()中会被缩放回 -near (-1)。issue#34
(2022-06-03)
get_rays()
get_rays()从像素平面构建ray的方向向量dir:
首先把像素坐标 (u,v) 反投影到相机系 (RUB) 下: (xₚ=(u-cx)/f, yₚ=-(v-cy)/f, zₚ=-1),v轴与y轴反向,取这些点深度值=-1(如下图)。
再乘以 c2w 变换到 world 坐标系下。从而一条光线在世界系中表示为:𝐫=𝐨+t𝐝)dir 与球坐标 φθ 没有关系。
nerf-issue#24: the direction in get_rays;
爱睡觉人人04:07
-
Colmap/OpenCV中的相机坐标系是
[right | down | forwards], 经过LLFF存储poses为[down|right|backwards], NeRF 在_load_data()读取后立即变换为 (OpenGL中的相机系)[right | up | backwards]。poses_bounds.npy文件中是 camera-to-world!(而不是外参矩阵!) 每一行17个值, 前15个值是3x5的pose matrix,最后2个值是near,far场景边界。 一个 pose matrix 由5个列向量组成:cam down-axis, cam right-axis, cam back-axis, cam center, hwf(cam intrinsics), 前3列是世界系下的相机系。_load_data()返回的 poses 是 reshape 后的(3,5,20), 索引 poses[:,1:2] 对应到matrix中的第2列。 所以在 #250行 重新调整poses的"行"顺序,使R的列顺序(相机系)为:[right,up,back]。又在#251行把poses变回(20,3,5) Using your own poses without running COLMAP-LLFF在后续工作中,把nerf使用的poses(经
load_llff_data()处理,作用为cam-to-avg_cam),又变回OpenCV下的相机系(比如IBRNet,GNT)。 如下图(from Zirui Wang-Twitter)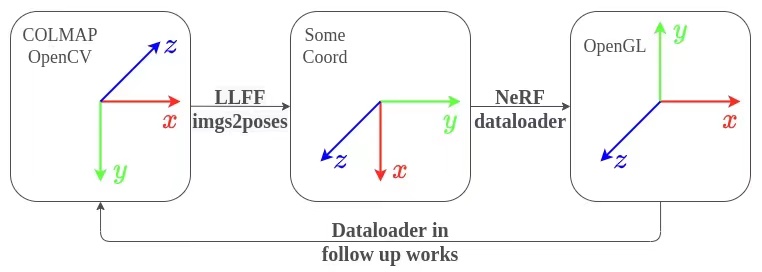
(2022-11-14)
-
The direction of the constructed world rays
rays_dshould not be normalized to 1 when used for sampling points (where in nerf-pl is wrong confess). Original nerf didn’t normalize in get_rays(). Because the points are sampled based on z, so they locate on parallel planes. If the directions are normalized, the plane will become a sphere.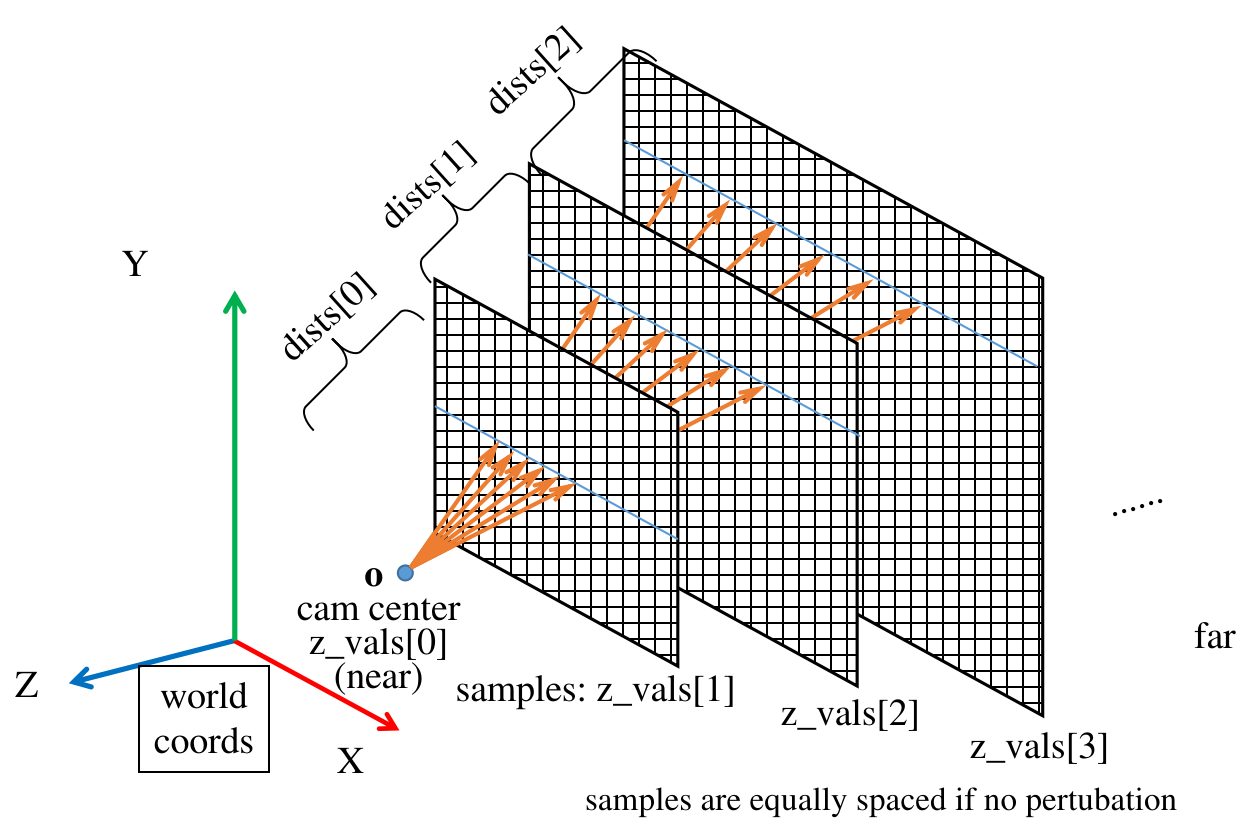
But the
viewdirsis normalized when it used as the model input (See run_nerf.py line#306).viewdiris the normalizedrd.
(2024-07-15)
-
把网络输出的 volume density 转换成 alpha 时,把采样点的 z 坐标间距
dists转换成了光线段的 Euclidian 长度: z 间距乘以 rays_d 的模长.Alpha (self-occluaion自遮挡) 与 光线段长度 成正比.
dist
dists are intervals between [near,far] and used for transforming the density σ (activation) to opacity α of each interval on the ray: α=(1-e⁻ʳᵉˡᵘ⁽⁶ ᕁ ᵈⁱˢᵗ⁾), because the opacity is proportional to distance (“thickness”). The dists can be equal when no perturb, so if density is high like around the surface, the opacity is close to 1. And the color coefficient: w=(1-α) ∏ₜ₌₁ᵗ⁻¹ αₜ is monotonically decreasing, so the further a point is, the smaller its color coeff will be until 0.
- The derivative of color weight at the surface point t∗ is not zero: $dw(t^∗)/dt < 0$ (see Neus proof). Hence, the minia is not on the surface.
Errors
(2023-05-13)
mogrify error
A new environment is created on Ubuntu 22.04. The package imagemagick is installed in the env nerf by checking conda list.
But when I debug the code in vscode, the shell /bin/sh cannot found the command mogrify:
|
|
Testing in a terminal, if the env is (nerf), executing the command: /bin/sh -c mogrify is okay and it will prompt the optional arguments.
But if the env is (base), executing /bin/sh -c mogrify, the same error occurs: /bin/sh: 1: mogrify: not found.
-
I found a Chinese post for the same problem. He installed imagemagick again:
sudo apt install imagemagick【NeRF】在yenchenlin/nerf-pytorch上运行新的数据集 -
For this CalledProcessError
"/bin/sh: 1: MY_COMMAND: not found"problem, some people suggest to create a link to /usr/bin, e.g., linux.org and ms-community -
mogrifydoesn’t exist in /opt or /usr as the commandfind /opt /usr -name magickdidn’t return anything. mogrify command not found (homebrew)mogrify only exits in:
1 2 3(nerf) w@homepc:~$ find ~/anaconda3 -name mogrify /home/w/anaconda3/pkgs/imagemagick-7.1.1_5-pl5321h211c493_1/bin/mogrify /home/w/anaconda3/envs/nerf/bin/mogrify
Therefore, maybe the debugger of vscode will only search in the /usr/bin (without searching the newly created virtrual envs) ?
But the interperter of VScode is indeed shown as Python 3.7.12 ('nerf') ~/anaconda3/envs/nerf/bin/python. I don’t know …
Solutions:
- Creat a symbolic link
sudo ln -s ~/anaconda3/envs/nerf/bin/mogrify /usr/bin/mogrify, then that error disappeared. apt install imagemagickworks too because it creates a binary in /usr/bin, which will be found by “/bin/sh”.- (Didn’t try) Add the
~/anaconda3/envs/nerf/binintoPATHby adding the line:export PATH=$PATH:/home/zichen/anaconda3/envs/nerf/binin ~/.bashrc
imread_v2() error
The version of imageio in this env is 2.28.1. And it’s 2.19.0 in my lab server. When reading images:
|
|
|
|
Maybe I can remove that argument. But I chose to downgraded the package: conda install imageio=2.19.0.
(2023-05-14)
Blas GEMM launch failed
Matrices cannot be multiplied at the 1st layer, but the input data and the coarse model both are correct.
|
|
Error message:
|
|
-
Reboot doesn’t work. (Verified: nothing to with imagemagick.)
-
nvidia-smidoesn’t show another process (notebooks, pycharm) using GPU besides Xorg and gnome-shell. -
Nvidia suggested 30 series card to use CUDA 11.2 or newer. Error Internal: Blas GEMM launch failed 30系显卡不兼容?-知乎; Problems Training on RTX3080 - DeepSpeech - Mozilla Discourse
-
Solution is using tf1.15 maintained by Nvidia Dr.Donald-2020-12-09 ,referenced by this post Solved: Error with Tensorflow & GPU - Dataiku community And this package requires Python 3.8, but nerf is using 3.7, so there is an error:
error: subprocess-exited-with-error, when installingpip install --user nvidia-tensorflow[horovod]issue#15 However, if I directly downgradeconda install python=3.8, there will be too many conflict error. Also modifying environment.yml and creating based on that doesn’t work neither.Base on the answer on SO, I create a new env:
1 2 3 4 5 6conda create -n nerf-nvtf python=3.8 conda activate nerf-nvtf pip install --user nvidia-pyindex # conda install -c conda-forge openmpi # for multi-GPU # export LD_LIBRARY_PATH=$LD_LIBRARY_PATH:$HOME/anaconda3/envs/nerf/lib/ pip install --user nvidia-tensorflow[horovod]Then I tried
import tensorflowworks. But once I installed other packages:1conda install numpy matplotlib imageio imageio-ffmpeg configargparse imagemagickThen
import tensorflowcannot find the module.Is this problem caused by the following modificaitons?
1 2 3 4 5 6 7 8 9 10 11 12 13 14 15The following packages will be REMOVED: libgomp-11.2.0-h1234567_1 The following packages will be UPDATED: libgcc-ng anaconda/pkgs/main::libgcc-ng-11.2.0-~ --> anaconda/cloud/conda-forge::libgcc-ng-12.2.0-h65d4601_19 libstdcxx-ng anaconda/pkgs/main::libstdcxx-ng-11.2~ --> anaconda/cloud/conda-forge::libstdcxx-ng-12.2.0-h46fd767_19 zlib anaconda/pkgs/main::zlib-1.2.13-h5eee~ --> anaconda/cloud/conda-forge::zlib-1.2.13-h166bdaf_4 The following packages will be SUPERSEDED by a higher-priority channel: _libgcc_mutex anaconda/pkgs/main::_libgcc_mutex-0.1~ --> anaconda/cloud/conda-forge::_libgcc_mutex-0.1-conda_forge _openmp_mutex anaconda/pkgs/main::_openmp_mutex-5.1~ --> anaconda/cloud/conda-forge::_openmp_mutex-4.5-2_kmp_llvm python anaconda/pkgs/main::python-3.8.16-h7a~ --> anaconda/cloud/conda-forge::python-3.8.16-0_73_pypyI tried to remove those packages, but there’s a long waitting.
So I create a new environment:
1 2 3 4 5conda create -n nerf-nvtf-1.15 python=3.8 conda activate nerf-nvtf-1.15 pip install --user nvidia-pyindex pip install --user nvidia-tensorflow[horovod] pip install 'imageio==2.19.0' configargparseThen the code can run normally.
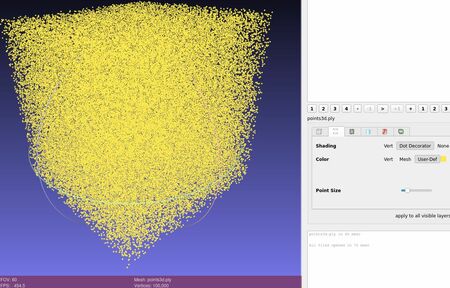
Lego ply
(2024-04-03)
The points3d.ply opened in Meshlab is a cube.