
Notes
The editing feature is based on Embedded deformation for shape manipulation
The transformation of each Gaussian in the entire point cloud is an expaction of the transformations of the K nearest control points.
Play
Environment
(2024-03-11)
Ubuntu 20.04, cuda-11.6
|
|
-
If I directly run
pip install -r requirements.txt, the following error about pip compiling occurs:1 2 3 4 5 6 7 8 9 10 11 12 13 14 15 16 17 18 19 20 21 22 23 24 25 26 27 28(SC-GS) yi@yi:~/Downloads/SC-GS-comments$ pip install -r requirements.txt ... Collecting git+https://github.com/facebookresearch/pytorch3d.git (from -r requirements.txt (line 14)) Cloning https://github.com/facebookresearch/pytorch3d.git to /tmp/pip-req-build-2ndb6zwl Running command git clone --filter=blob:none --quiet https://github.com/facebookresearch/pytorch3d.git /tmp/pip-req-build-2ndb6zwl Resolved https://github.com/facebookresearch/pytorch3d.git to commit 7566530669203769783c94024c25a39e1744e4ed Preparing metadata (setup.py) ... error error: subprocess-exited-with-error × python setup.py egg_info did not run successfully. │ exit code: 1 ╰─> [6 lines of output] Traceback (most recent call last): File "<string>", line 2, in <module> File "<pip-setuptools-caller>", line 34, in <module> File "/tmp/pip-req-build-2ndb6zwl/setup.py", line 15, in <module> import torch ModuleNotFoundError: No module named 'torch' [end of output] note: This error originates from a subprocess, and is likely not a problem with pip. error: metadata-generation-failed × Encountered error while generating package metadata. ╰─> See above for output. note: This is an issue with the package mentioned above, not pip. hint: See above for details. -
Compilin Pillow requires:
sudo apt-get install libjpeg-dev. Otherwise, error occus:1 2 3 4 5 6 7 8 9 10 11The headers or library files could not be found for jpeg, a required dependency when compiling Pillow from source. Please see the install instructions at: https://pillow.readthedocs.io/en/latest/installation.html note: This error originates from a subprocess, and is likely not a problem with pip. ERROR: Failed building wheel for Pillow Running setup.py clean for Pillow Failed to build Pillow ERROR: Could not build wheels for Pillow, which is required to install pyproject.toml-based projects
-
PIL error:
no attribute 'ANTIALIAS'1 2 3File "/home/yi/anaconda3/envs/SC-GS/lib/python3.10/site-packages/torch/utils/tensorboard/summary.py", line 486, in make_image image = image.resize((scaled_width, scaled_height), Image.ANTIALIAS) AttributeError: module 'PIL.Image' has no attribute 'ANTIALIAS'ChatGPT: The api has changed, the function should be called like:
Didn't try
1 2 3from PIL import Image, ImageFilter # ... image = image.resize((scaled_width, scaled_height), ImageFilter.ANTIALIAS)This error is solved by reinstalling the conda environment with
python=3.8, pip will download the packages compatible (cp) with python 3.8. And Pillow cp38 still have the same api.
Train
Train on 1050Ti (4GB)
|
|
80000 iterations cost 1:47:24.
Deformation
Once the model has been trained, launch GUI with the output dir (just add --gui):
|
|
Unlike LBS, the model can be teared intio pieces.
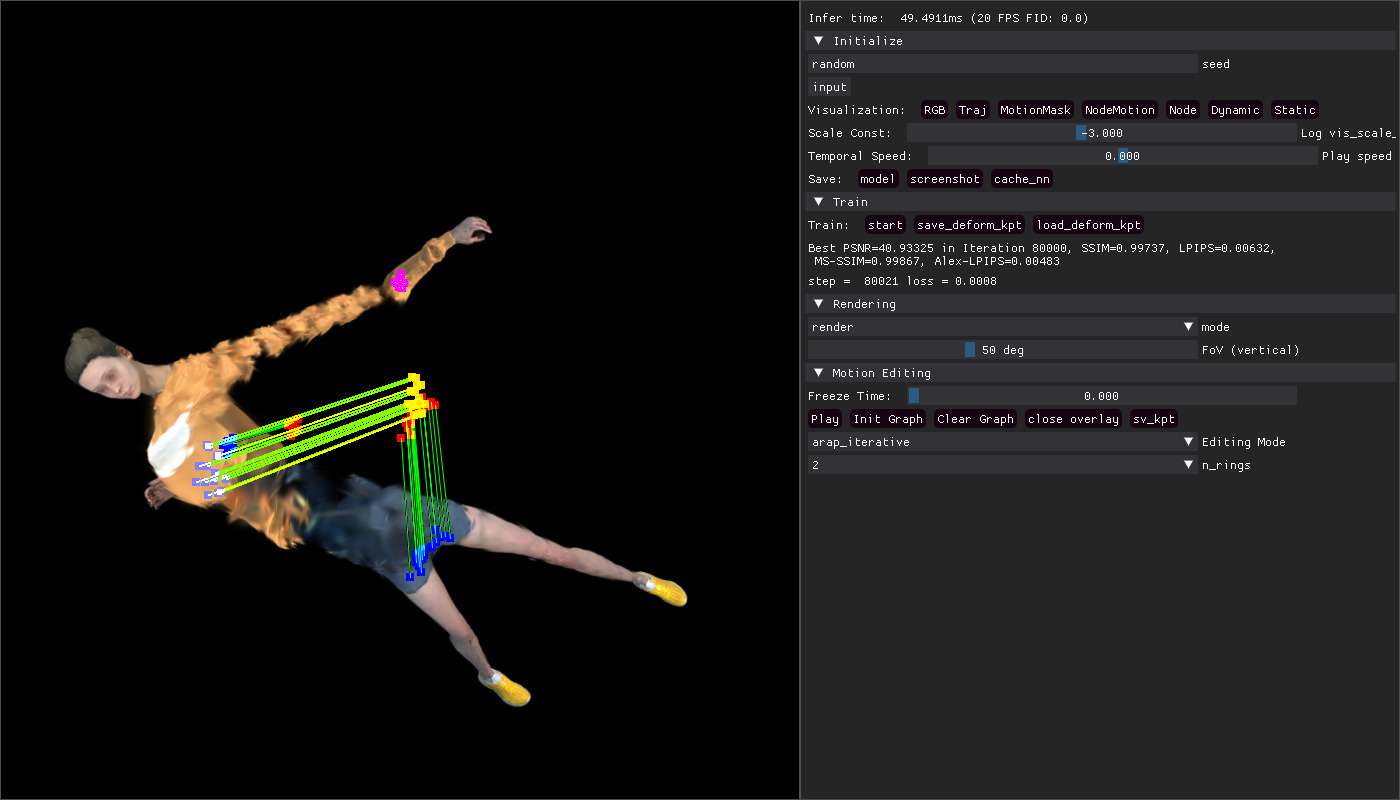
And the deformation may be anti-physical.
After adjusting the poses, clik play to watch animation.
To debug the deformation code, once selected keypoints (A+Left Clik), Pause the debugger first, and then step by step inspect.
-
Press
D+ Right-click drag will triggercallback_keypoint_drag -
Click
Init Graphwill tiggercallback_animation_initializeto assign the attributeanimate_toolby instantiating the classLapDeform
|
|
The command for eval only change train_gui.py to render.py:
|
|